Welcome to Mail Configuration
Here you can find out how to set up your email programmes to run with your new mail account(s).
- Outlook 2003 - How to create a new Mail Account in Outlook 2003
- Outlook 2007 - How to create a new Mail Account in Outlook 2007
- Outlook Express- How to create a new Mail Account in Outlook Express (NOT Outlook)
- Vista Email - How to create a new Mail Account in the mail programme that comes with Microsoft Vista
We will post new email configurtions as new mail programmes become available!
INTRODUCTION
You will have been sent :
username : This is your full email address e.g. john.smith@my-website.co.uk (there are no spaces in email addresses)
password : This must be entered correctly paying particular attention to UPPERCASE and lowercase characters
POP3 Server Address : mail.my-website.co.uk - this is the INCOMING or POP3 server address used to RETRIEVE mails
SMTP Server Address : smtp.my-website.co.uk - this is the OUTGOING server used to SEND emails
Outlook
Configure mailboxes in Outlook 2003
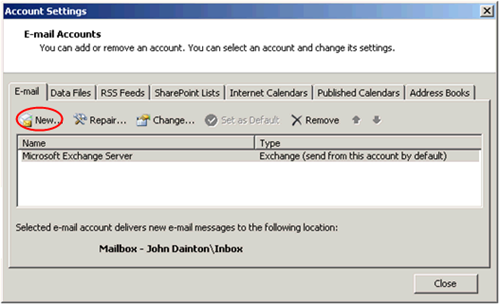
You can access Standard and Advanced mailboxes using Microsoft Outlook 2003.Step 1: Open Outlook 2003, click Tools in the top menu, then click E-mail Accounts.
Step 2: Select Add a new e-mail account, then click the Next button.
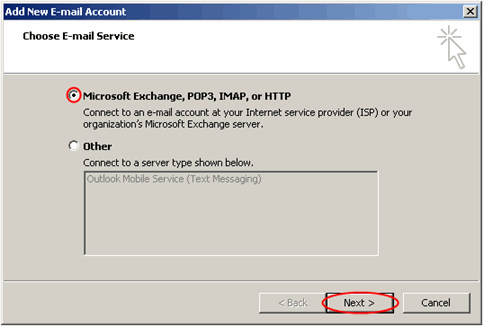
Step 3: Select POP3 from the list of available server types, then click Next.
Step 4: Enter your name in the Your Name text-box and your email address in the E-mail Address text-box.
Step 5: Enter your full email address in the User Name text-box and your mailbox password in the Password text-box.
Step 6:In the Incoming mail box enter 'mail.yourdomain.co.uk' do not use quotes and substitute your domain name for the words yourdomain.co.uk e.g. mail.my-website.co.uk
Step 7 . In the Outgoing mail (SMTP) box enter 'smtp.yourdomain.co.uk' do not use quotes and substitute your domain name for the words yourdomain.co.uk e.g. smtp.my-website.co.uk
Step 8: Click the More Settings button.
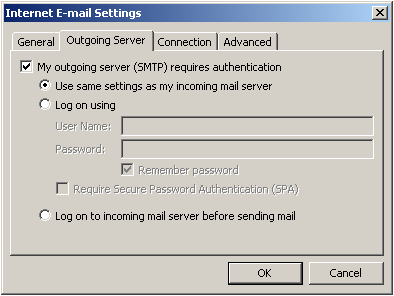
Step 9: Click the Outgoing Server tab.
Step 10: Select My outgoing server (SMTP) requires authentication, ensure Use same settings as my incoming mail server is selected, then click the OK button.
Step 11: Click the Test Account Settings button and correct any errors that it identifies.
![]() Note: Outlook's Test Account Settings procedure occasionally fails even if the account settings are correct. If it repeatedly fails and you are certain that the account settings are correct, skip to step 12, then test your setup by sending an email to yourself.
Note: Outlook's Test Account Settings procedure occasionally fails even if the account settings are correct. If it repeatedly fails and you are certain that the account settings are correct, skip to step 12, then test your setup by sending an email to yourself.
Step 12: When the test gives you the message Congratulations! All tests completed successfully, click the Next button, then click the Finish button.
IMPORTANT NOTE: Some ISPs prevent ANY outgoing mail even if the settings are lgitimate. You can sometimes stop a blockage bt changing the default outgoing port from 25 to 225 (i.e. just add and extra number 2). You do this by going into Outlook | Tools | View of change existing accounts | highlight your email account and click CHANGE ...| click MORE SETTINGS ... | Select the ADVANCED tab | and change the port setting in the Outgoing (SMTP) box to 225 | Say OK to all the windows you previously opened and test your mail.
Setting up a mailbox with Outlook 2007
Step 2: Select the E-mail tab and click New.
Step 3: Select POP3 from the list of available server types, then click Next.
Step 4: Select Manually configure server settings of additional server types and click Next
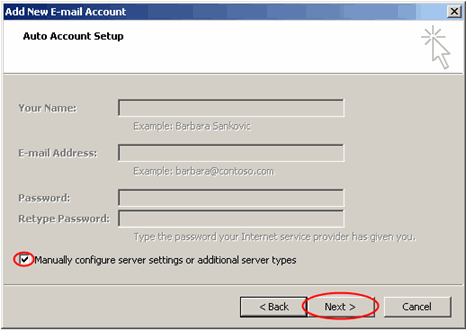
Step 5: Select Internet E-mail and click next.
Step 6: Enter your name in the Your Name text-box and your email address in the E-mail Address text-box
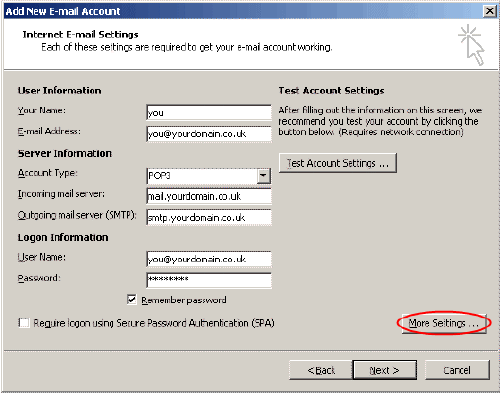
Step 7: Enter and confirm your mailbox password in the Password text-box, then select Remember password.
Step 8:In the Incoming mail box enter 'mail.yourdomain.co.uk' do not use quotes and substitute your domain name for the words yourdomain.co.uk e.g. mail.my-website.co.uk
Step 9 . In the Outgoing mail (SMTP) box enter 'smtp.yourdomain.co.uk' do not use quotes and substitute your domain name for the words yourdomain.co.uk e.g. smtp.my-website.co.uk
Step 10: Click on More Settings
Step 11: Click the Outgoing Server tab and tick My outgoing server (SMTP) requires authentication and Use same settings as my incoming mail server.
![]() Note: Some ISPs will block port 25 for sending emails. If this is the case with your ISP you should click the Advanced tab and change your outgoing SMTP port from 25 to 225.
Note: Some ISPs will block port 25 for sending emails. If this is the case with your ISP you should click the Advanced tab and change your outgoing SMTP port from 25 to 225.
Step 12: Click OK
Step 13: Click the Test Account Settings button and correct any errors that it identifies.
![]() Note: Outlook's Test Account Settings procedure occasionally fails even if the account settings are correct. If it repeatedly fails and you are certain that the account settings are correct, skip to step 12, then test your setup by sending an email to yourself.
Note: Outlook's Test Account Settings procedure occasionally fails even if the account settings are correct. If it repeatedly fails and you are certain that the account settings are correct, skip to step 12, then test your setup by sending an email to yourself.
Step 13: When the test gives you the message Congratulations! All tests completed successfully, click the Next button, then click the Finish button.
Outlook Express
Configuring Outlook Express to Send and Receive E-mail
This article describes how to set-up Outlook Express so that you can use it to send and receive e-mail to/from your Calco UK Web Services domain.
1. Open Outlook Express.
2. Select the Accounts option from the Tools menu. The Internet Accounts dialog box appears:
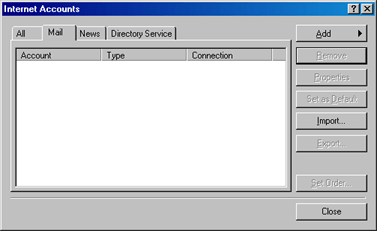
3. Click on the Add button to add a new account.
4. Click on the Mail… option from the menu that appears. The Internet Connection Wizard appears:

5. Enter the name you want to appear in the From field of outgoing e-mail messages, and click on the Next button.
6. Enter the e-mail address that people must use when sending e-mail to you, and click on the Next button. The E-mail Server Name dialog box appears:
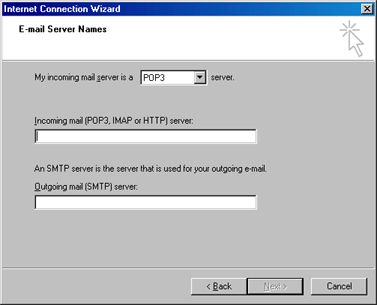
7. In the Incoming mail box enter 'mail.yourdomain.co.uk' do not use quotes and substitute your domain name for the words yourdomain.co.uk e.g. mail.my-website.co.uk
8. In the Outgoing mail (SMTP) box enter 'smtp.yourdomain.co.uk' do not use quotes and substitute your domain name for the words yourdomain.co.uk e.g. smtp.my-website.co.uk
If you are BLOCKED by your ISP (Internet Service Provider), that is .. the company such as BT, who provide your BROADBAND service, you must call them and ask them to UNBLOCK the service to allow you to use their MAIL RELAY or your own SMTP SERVER which is smtp.my-website.co.uk
Click on the Next button. The Password dialog box appears:
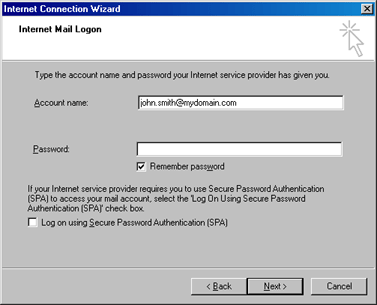
9. Enter, in the Account Name box, the e-mail address from which you are going to retrieve mail in the form mail@yourdomain.co.uk - substitute your domain name for the words yourdomain.co.uk e.g. john.smith@my-website.co.uk
10. Enter the mailbox password you were issued with and click on the Next button to complete the configuration of Outlook Express.
You can now use Outlook Express to receive e-mail no matter which ISP you are connected to.
If you have multiple email accounts simply go through the above procedure for each one and remember to include the FULL email address as your ACCOUNT NAME in each case. (not just john or mary or sales etc but rather john.smith@my-website.co.uk)
NOTE: Some ISPs block SMTP servers- you can get round this problem... for more information click here
Vista Mail
Step 1: Click the Windows logo in the bottom left-hand corner of your screen, then click Windows Mail.
Step 2: Windows Mail will open. Click the Tools menu, then click Accounts.
Step 3: The Internet Accounts window will open. Click Add in the top right corner. Click Mail in the menu that appears. This will open the Internet Connection Wizard.
Note: If it is the first time you have run Mail on this computer, the Internet Connection Setup wizard may start automatically.
Step 4: On the first screen of the Internet Connection Wizard, you'll be asked to enter a display name. This is what most email users will see in the inboxes instead of your email address. Enter your name, then click Next.
Step 5: Enter your full email address. This made up of the mailbox name you chose, an @ symbol and your domain name. Then click Next
Step 6: On the E-mail Server Names screen, select POP3 from the drop-down list.
Enter mail.my-website.co.uk (replacing yourdomain.co.uk with your domain name) in the Incoming mail (POP3, IMAP or HTTP) server text box.
Enter smtp.my-website.co.uk in the Outgoing mail (SMTP) server text box.
When you have entered your mail server names, click Next.
Step 7: On the Internet Mail Logon screen, enter your full email address in the Account name text box. If you enter just the mailbox name this will not work.
When you created the mailbox, you chose a password. Enter this in the Password text box.
When you have entered your mailbox name and password, click Next.
Important: Outgoing server requires authentication should be ticked.
When you have entered your mailbox name, password and advised that your outgoing server requires authentication, click Next.
Step 8: Click Finish and the mailbox will be added to Windows Mail.
Step 9: Click Close to close the wizard and start using your email account.